Как вставить json в confluence
Таблица в Atlassian Confluence на основе данных из REST запроса
В этой статье я расскажу, как сделать страницу в Atlassian Confluence с таблицей, данные в которую будут приходить из REST запроса.
Мы сделаем страницу в Confluence с таблицей, которая будет содержать данные о проектах в Jira. Эти данные мы будем получать из Jira при помощи метода project из стандартного Jira REST API.
Вы можете посмотреть видео по этой статье вот здесь.
Установим Power Scripts for Confluence
Мы будем выполнять вызов Jira REST API с помощью плагина Power Scripts for Confluence. Это бесплатный плагин, поэтому это решение ничего не будет Вам стоить.
Ну, и первое, что нам нужно сделать, это установить плагин Power Scripts for Confluence в наш Confluence. Подробную инструкцию, как это сделать, можно почитать вот здесь.
Напишем скрипт
Создадим файл getProjects.sil вот с таким кодом:
Измените адрес host.docker.internal:8080/ на адрес Вашего экземпляра Jira.
Запустите скрипт, чтобы проверить, что данные выбираются из Jira:
Создадим страницу в Confluence
Теперь создадим страницу в Confluence с макросом SIL table. В поле scripts введите имя нашего скрипта getProjects.sil:
Опубликуйте страницу и Вы увидите вот такой результат:
Усложним задачу
Добавим в таблицу следующую функциональность:
Заодно немного отрефакторим.
Вот что будет делать наш скрипт:
Теперь давайте конкретизируем, как мы получаем данные о проектах:
Теперь определим структуры данных о наших проектах.
Вот ответ, который возвращает project метод из Jira REST API (я удалил ненужные данные, чтобы сделать ответ короче и поэтому более читабельным):
Как мы видим, значения для полей key, name и projectTypeKey определены на первом уровне нашего json. А вот для поля lead вместо значения мы видим json. А этот json уже и содержит значения полей name и displayName. Поэтому сначала создадим структуру для json в поле lead (Lead):
Вот теперь мы готовы сделать структуру и для первого уровня нашего json (Project):
Но проблема в том, что макрос SIL table может работать только с json с одним уровнем вложенности, поэтому нам нужно переконвертировать нашу структуру с двумя уровнями вложенности (Project) в структуру с одним уровнем вложенности (плоскую структуру). Но сначала создадим плоскую структуру (TableRow):
А теперь напишем функцию для конвертации данных в структуре Project в структуру TableRow:
Вот финальный код getProjects.sil:
Теперь обновим страницу в Confluence и увидим, что наши данные о руководителе проекта подтянулись:
Но имена колонок какие-то невразумительные. Давайте дадим более красивые имена.
Редактирум страницу, Редактируем макрос SIL table и вводим «Ключ проекта, Имя проекта, Тип проекта, Руководитель проекта, ФИО руководителя проекта» в поле columns:
Generating JSON output in Confluence with Jsonator
This document gives a technical overview of how JSON content can be generated in Confluence with the Jsonator framework.
The Jsonator framework makes it easy for XWork actions in plugins and Confluence core code to generate JSON for AJAX-related functionality in the web UI. It is also possible to extend the Jsonator framework in Confluence core code to provide custom serialisation for new types of objects.
Writing an action that generates JSON
To generate JSON from an XWork action, you map the result of the action to the ‘json’ result type. For example:
XWork action mapping
In your XWork action class, make sure it implements Beanable
provided by Confluence will invoke the getBean() method and automatically convert that into a JSON response.
Here is an example action class that returns a list of pages in the user’s history:
Example JSON action class
The two relevant parts of this action are:
Here is some sample output from this action, reformatted for readability:
Sample JSON output
Adding JSON generation to an existing action
The normal process of converting an existing action to return JSON is as follows:
The action was modified to implement Beanable and return the preexisting PaginationSupport class:
A new mapping was added to the /json/ package to expose the JSON functionality on /json/searchsite.action
Support serialisation objects
The DefaultJsonator includes implementations for the following types of objects (as of Confluence 3.3):
Primitive types and objects:
The fallback for an object which is not of any of the above types is a generic JavaBean serialiser which will convert the object to a JSON object using any exposed JavaBean properties. Be careful of using this if objects returned from getBean() have non-trivial getter methods.
Customising object JSON serialisation
To add custom JSON serialisation in Confluence, you need to write a new implementation of the Jsonator interface and add it to the DefaultJsonator configuration in the applicationContext.xml Spring context.
The Jsonator interface (as of Confluence 3.3) looks like this:
Implementations must implement the single convert() method to return the associated JSON. The classes in the com.atlassian.confluence.json.json
package should be used to generate the JSON.
As an example, here is the implementation of AttachmentJsonator:
Insert the code block macro
This macro was intentionally excluded from the new editor and replaced with the Code Snippet element. Learn more
The Code Block macro allows you to display source code in your page with syntax highlighting, like the one below:
Add the Code Block Macro
The Macro Browser allows you to view the list of available Confluence macros and to add them to the current page or blog post.
Speeding up macro entry with autocomplete:
To edit an existing macro
Click the macro placeholder and choose Edit. A macro dialog window will open, where you can edit the parameters of the macro.
You type the code block directly into the macro placeholder in the editor. Note that any white space contained in the placeholder is not manipulated in any way by the Code Block macro. This is to provide the writer with flexibility over code indentation.
Parameters
Parameters are options that you can set to control the content or format of the macro output. Where the parameter name used in Confluence storage format or wikimarkup is different to the label used in the browser, it will be listed below in brackets ( example ).
Syntax highlighting
(language )
Specifies the language (or environment) for syntax highlighting. The default language is Java but you can choose from one of the following languages/environments:
Title
Adds a title to the code block. If specified, the title will be displayed in a header row at the top of the code block.
Collapsible
(collapse )
If selected, the code macro’s content will be collapsed upon visiting or refreshing the Confluence page. Clicking the expand source link allows you to view this content. If false, the code macro’s content is always displayed in full.
Show line numbers
(linenumbers )
If selected, line numbers will be shown to the left of the lines of code.
First line number
(firstline )
When Show line numbers is selected, this value defines the number of the first line of code.
Theme
Specifies the color scheme used for displaying your code block. Many of these themes are based on the default color schemes of popular integrated development environments (IDEs). The default theme is Confluence (also known as Default), which is typically black and colored text on a blank background. However, you can also choose from one of the following other popular themes:
Configure the Code Block macro
You can configure the Code Block macro to use a specific language and theme by default
To set the default appearance of code blocks in your site:
All new code blocks will use the default theme and language unless you specify otherwise. Existing code blocks will be unchanged.
Wiki markup example
Wiki markup is only supported in the legacy editor.
Writing a macro using JSON
This tutorial applies to Confluence 4.x and later
Level of experience:
This is an intermediate tutorial. You should have completed at least one beginner tutorial before working through this tutorial. See the list of tutorials in DAC.
It should take you approximately 1 hour to complete this tutorial.
Overview of the tutorial
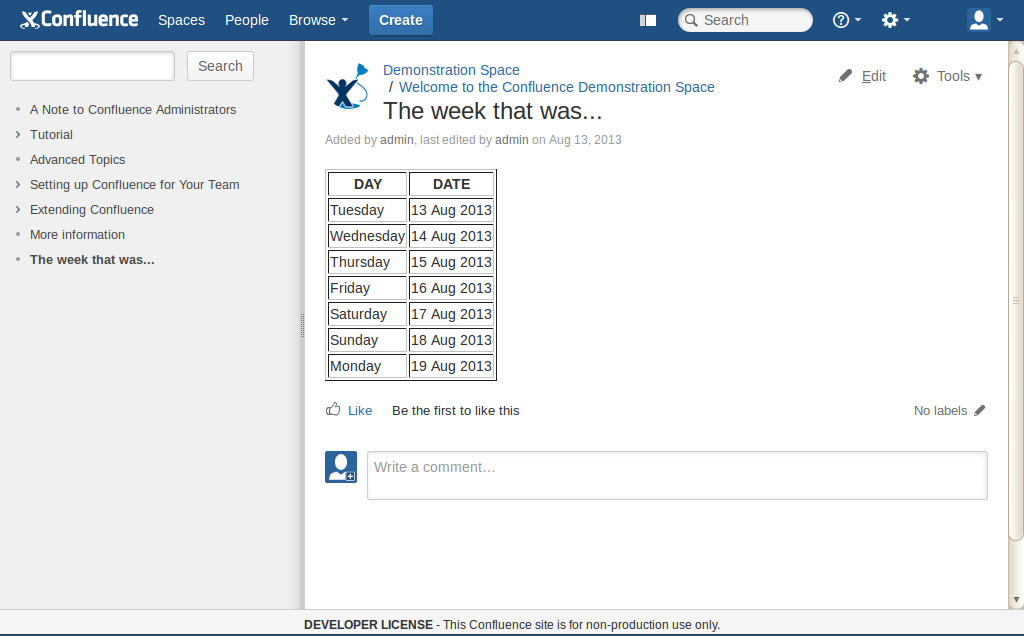
In this tutorial, you create a Confluence macro that prints out the days of the week starting on a given date. If a user supplies a date as a macro parameter, the macro prints the days of the week starting on that date. Otherwise, it shows the the days of the week starting with the current date.
While the calendar itself isn’t very useful, it will demonstrate how to use the Confluence JSON APIs from the plugin Java code. Our calendar will be composed by JSON data.
About these Instructions
You can use any supported combination of OS and IDE to construct this plugin. These instructions were written using IDEA on Mac OS X. If you are using another combination, you should use the equivalent operations for your specific environment.
This tutorial was last tested with Confluence 5.1.4.
Required knowledge
To get the most out of this tutorial, you should be familiar with:В
Also, while this tutorial demonstrates how to work with JSON data in a plugin, it does not discuss JSON itself. For more information on JSON, see http://www.json.org/
Plugin source
We encourage you to work through this tutorial. If you want to skip ahead or check your work when you have finished, you can find the plugin source code on Atlassian Bitbucket. Bitbucket serves a public Git repository containing the tutorial’s code. To clone the repository, issue the following command:
Alternatively, you can download the source as a ZIP archive by choosing download here: bitbucket.org/atlassian_tutorial/writing-a-macro-using-json
Step 1. Create the plugin project
In this step, you’ll use the Atlassian Plugin SDK to generate the scaffolding for your plugin project. The Atlassian Plugin SDK automates much of the work of plugin development for you.В
Enter the following command to create the project files for the plugin:
As prompted, enter the following project parameters:
Confirm your entries when prompted.
Step 2. Review the POM
The SDK generated a project directory with most of the artifacts our plugin needs, including a POM (Project Object Model) file. The POM describes your project and declares your plugin build dependencies. It’s a good idea to open and review the POM after generating a new project. Let’s do that now, making a few changes to the generated content as we go.В
Add your company or organisation name and your website to the organization element:
Update the description element:
Step 3. Tweak the plugin descriptor
Next we’ll make a few changes to the plugin descriptor file. Among other things, the descriptor tells Confluence what UI elements the macro wants to extend or implement. In the Atlassian plugin framework, a unit of functionality is encapsulated by a module. For our plugin, we’ll modify the Web Resource
module that the SDK gave us and add a type ofВ Macro Module,В xhtml-macro :
Add the following resource element to the web-resource element in the descriptor:
This is the Velocity template that we’ll create in a bit.
Add the following as a child of atlassian-plugin :
Step 4. Add presentation resources
Our macro generates its presentation through a JavaScript and a Velocity resource. The SDK gave us a default JavaScript file we can use. The Velocity template we’ll have to add. Do that now:В
In the templates directory you just created, create a file named examplemacro.vm and add the following content to the file:
Notice that our Velocity template consists of resource statements and aВ div В with a singleВ fieldset В element. The element contains a hiddenВ input В element, to which we assign the output of our macro’sВ execute В method (that is, the URL-encoded, serialized JSON object string). The requireResource В statements include the JavaScript file we’ll create for this macroand the jQueryВ JavaScript framework.
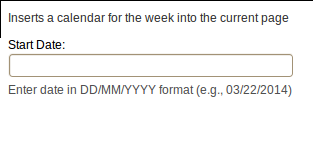
These will provide the label and description for the parameter in the macro browser, as shown here:
Open src/main/resources/js/examplemacro.js and add the following content:
In most cases, a plugin would generate HTML in a Velocity template rather than in JavaScript as we’ve done here. However, we’ve included HTML in the JavaScript code just to keep our plugin simple, with the emphasis being on how to access values from JSON objects.
Our JavaScript code:
Of course, our JavaScript and Velocity presentation resources don’t have much to work with yet, as we still haven’t coded the macro logic. You’ll start on that next.
Step 5. Create the macro class
Let’s add the Java class that implements our macro logic. We’ll start simple, creating a macro that just generates placeholder text for now.
Add the following skeleton code:В
Step 6. Start up Confluence
We’re not done yet, but let’s start up Confluence and see what our macro does so far:
Run the following command:
This command builds your plugin code, starts a Confluence instance, and installs your plugin. This may take a minute or two. When it’s done, you will see many status lines on your screen concluding with something like this:
Open your browser and open Confluence at the address indicated in the output.
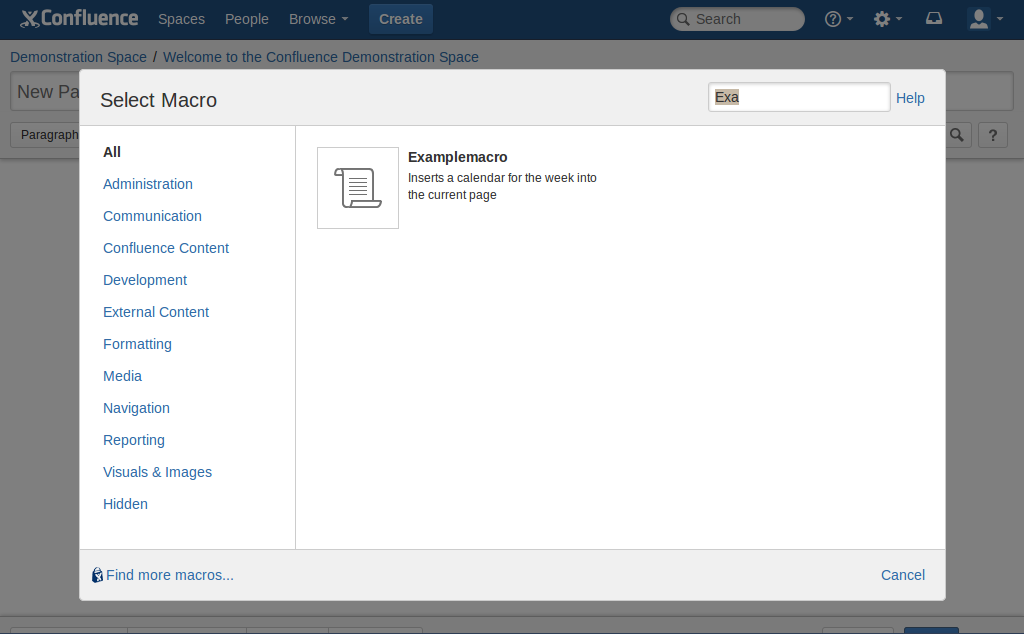
Browsing to the macro in the Select Macro dialog. You can do so quickly by typing the first few letters of the macro name, such as Exa.
Select the macro and insert it into your page.
As you saw in the preview pane and on the page after saving your changes, so far the macro generates our placeholder text, «Only a test». We’ll make it do more next.
You can keep Confluence running at this point,В В QuickReloadВ will automatically redeploy any changes you build.
Step 7. Make your macro do more
Let’s add the logic for generating our JSON-based calendar. We’ll take this task piece by piece, so that we can examine and discuss each part of the code as we go.
Open ExampleMacro.java for editing once again.
Replace the body of the execute() method with this:
Our new execute() method now:
Instantiates a JsonObject and JsonArray instance.
Populates the array by taking the parameter as the starting date and looping seven times, each time incrementing the date by one. On each loop, the date is formatted by name and date, with the results stored in the JSON array (with the help of a method we’ll create in a bit).
It sets the array as a daysdates property of the JSON object.
Add the getStartDateFromParams() method called from execute() to theВ ExampleMacro class:
TheВ params В argument always contains aВ RAW_PARAMS_KEY В key containing the raw parameter string, so we’ll only parse parameters whenВ params.size В is greater than 1. Also note that if the user doesn’t provide a date, theВ startDate В is initialized to the current date, which serves as our default.
This method simply populates a JSON object with the day and date for each cycle of the execute() loop.В
So far, we stored the days and dates information as a JSON object. We still need to output the results. Replace the existing return statement ( return «Only a test»; ) with these lines:
Notice our new return value. More realistically, you’d likely want to make your JSON available via REST, but REST is a topic for its own tutorial. To keep this simple, our plugin uses a Velocity template to render output as markup.
This is then rendered into aВ String В containing markup according to the Velocity template we already created.
Step 8. Check your code
You macro plugin class is now complete. To review, our execute() method now:
You can check your completed class against the following:
Expand to view entire Java class В Expand source
We’re ready to try the macro again.
Step 9. Test the completed macro
To see your new macro in action:
JSON Table Macro
On this page
Overview
JSON (JavaScript Object Notation) has become a highly used interchange format because of its lightweight, simplicity, and ability for humans to read and write easily. Many REST APIs produce JSON format and the format is used predominantly in Atlassian REST APIs. There is also an abundance of support libraries associated with the format which makes it ideal for scripting output.
The JSON table macro can import, format and display JSON (JavaScript Object Notation) data from anywhere, by:
Available in plugin release 6.3 and above.
Applicable upto app version 8.1:
To enable using HTML content with JSON data, you must enable the Stop encoding of html characters parameter. In such a case, it is recommended to contact your administrator to use Macro Security for Confluence with this app to provide an additional layer of security to your data and privacy. Refer to this documentation to for more information on the Macro Security for Confluence app.
From app version 8.2 onwards, if the Stop encoding of html characters parameter is enabled, use of Macro Security for Confluence is no longer needed as the macro itself provides additional security to your data.
Basic Use
This macro can be deployed using one of the following methods:
| Selected from the Macro Browser | JSON Table |
|---|---|
| Markup Shortcut |
Screenshot
Parameters
Augment parameters
See Augments for details for modifying column headings and column data.


